String art is a charming, hands‑on craft that turns simple materials (wood, nails, thread) into stunning personalized gifts. In this comprehensive guide, we cover everything: the history and definition of string art, a materials & tools checklist, a step-by-step DIY tutorial, and creative customization ideas (portraits, names, dates).
We highlight the best occasions to gift string art portrait (weddings, anniversaries, birthdays, housewarmings, etc.), and offer care & framing tips to protect your artwork. We compare making string art yourself vs. buying custom pieces (with pricing examples), and point you to resources for ordering personalized string art.
The Beauty of String Art: History & Definition
String art (also called nail & thread art or pin art) dates back to the 19th century as a way to visualize geometry. In fact, English mathematician Mary Everest Boole used “curve stitching” in the late 1800s to teach math concepts with straight lines that form curves. The technique re-emerged as a craft craze in the 1960s when hobbyists popularized wooden boards, nails, and colored thread kits. These easy-to-assemble kits (often featuring geometric shapes or words) made string art a trendy DIY home decor project. After waning in the 1980s, string art saw a 21st-century revival. Crafters began favoring a rustic, freeform style, using raw stained wood, exposed nails, and yarn in creative designs.
Today, string art is appreciated as both a mathematical-meets-art craft and a heartfelt gift. Its unique combination of precision and creativity makes it ideal for personalized décor and meaningful presents. Whether it’s a geometric pattern, a name in cursive, or a portrait outline, string art adds a handmade, nostalgic touch that mass-produced items lack.
Materials & Tools for DIY String Art
To create string art, you’ll need a handful of basic supplies. A typical materials list includes: a wooden base (board or plaque), small nails or pins, a hammer, and thread or yarn. You’ll also want a printed template or pattern of your design, painter’s tape (to hold the template), and optional paints/brushes if you want to color the background or edges.
Tips from crafters: Use solid wood or plywood as your backing it’s sturdy and holds nails well. If you prefer a finished look, you can paint the wood before nailing. Choose nails with a flat, wide head so the thread stays put. Finishing nails (with tiny heads) are not recommended, as thread can slip off. For thread, anything from cotton embroidery floss to wool or acrylic yarn works. Many makers even prefer bamboo yarn for its smoothness. Just ensure the thread is strong and won’t break under tension.
DIY String Art: Step-by-Step Tutorial
Creating a basic string art piece involves a few clear steps. First, set up your board and design:
- Prepare the wood base. Sand any rough edges and paint or stain the board if desired. Let it dry fully.
- Place the design template. Tape your printed design or stencil onto the board (centered and away from edges).
- Hammer the nails along the outline. Using a small hammer, tap nails along the template’s outline (about ½–¾ inch apart). Hold each nail carefully (or use pliers) and hammer straight down so all nails end up at roughly the same height. Remove the paper template once nails are in place.
- Tie and weave the thread. Tie the end of your thread or yarn to one nail (a few knots for security). Begin weaving: move the thread around the nails, following your pattern. For simple designs, a back-and-forth “zigzag” or random fill works. For more intricate shapes (like letters or curves), we recommend sketching out a wrap pattern first. Keep the thread taut as you go. Continue wrapping until the shape is “filled in” to your liking. Finally, tie off the thread on a nail, and trim any excess.
Close-up of hands weaving bright yellow thread around nails on a wooden board (Macro shot). This detail photo shows the typical string‑wrapping step in progress, forming a design between the nails.
- Finishing touches. Trim loose thread ends. Optionally, you can coat the finished piece with clear varnish or lacquer to protect it and fix the thread in place. Attach hanging hardware (sawtooth hanger or wire) on the back if you plan to wall-mount it.
This simple process can yield striking results. As one crafter put it: “Basically, you hammer down your nails along the outline of the design and weave thread around them to cover the shape.” The repetitiveness can even be relaxing – and it’s safe for kids with supervision.
Creative Customization Ideas
One of the charms of string art is that any design is possible. Here are some popular personalization ideas:
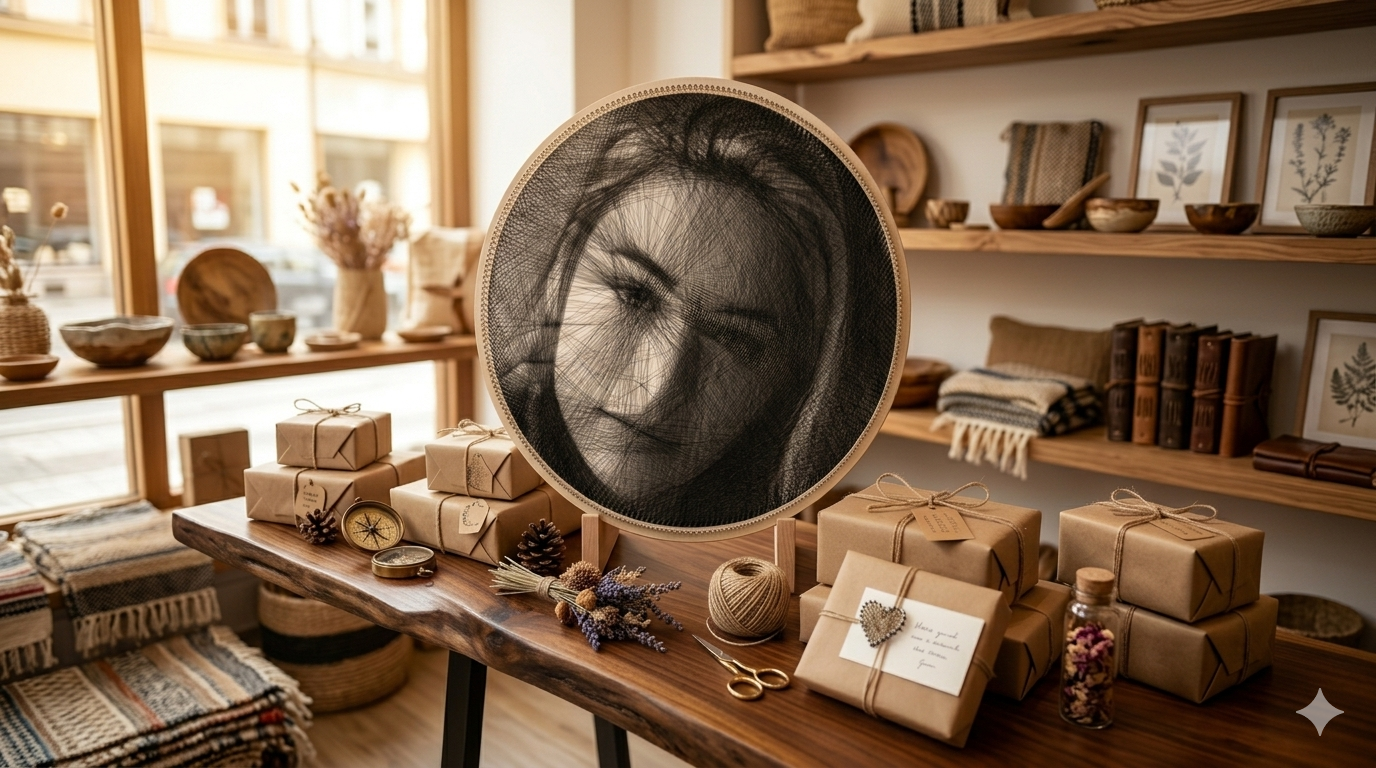
- Portraits from Photos: Turn a favorite photo into a string art portrait (silhouettes or face outlines). Many custom services will process your image and create a nail-and-thread design.
- Names and Words: Spell out names, dates, or meaningful phrases (e.g. “LOVE,” anniversary dates, baby’s name). These make great nursery decor or anniversary gifts.
- Hearts and Symbols: Hearts, stars, maps, animals, or hobby-related icons (guitars, bicycles, etc.) can all be formed by thread. For example, interlocking heart string art is a common wedding/anniversary gift motif.
- Multi-Color Thread: Use different colored threads to add depth. You can layer colors, do gradient fades, or highlight just the outline. Some people even use thin ribbon or wire for a decorative edge.
- Mixed Media: Combine string art with other elements, like small wooden cutouts, led lights, or fabric backdrops. LRCrafts mentions adding custom enamel pins or tiny charms for extra flair.
Whether it’s a string art family portrait, a custom name plaque, or a date commemorating a special event, the key is thoughtfulness. The time and care you put into the design make the gift deeply personal.
Best Occasions for String Art Gifts
String art gifts fit many occasions because they can be tailored to the person and event. Some perfect moments include:
- Weddings & Anniversaries: A string art with the couple’s names, wedding date, or intertwined hearts is a sentimental keepsake. (Some sellers offer wedding date heart designs or double-heart motifs).
- Birthdays: For milestone birthdays, consider a portrait or a string‑painted hobby icon (e.g. a guitar for a music lover). Younger kids love name or character-based string art in their room.
- Housewarming: A family name sign or “welcome” message in string art makes a home cozier.
- New Baby: Nursery art with the baby’s name or birthdate can be a treasured handmade gift.
- Graduations or Farewells: A thread portrait of friends or an inspirational word can mark life transitions.
- Holidays: Festive shapes (Christmas trees, pumpkins, snowflakes) done in cheerful thread colors add to seasonal decor.
In short, any time you want to give something unique and meaningful, string art is a great choice. It shows you “wrapped” your effort into the gift.
DIY vs. Buying Custom: Which to Choose?
DIY Advantages: Crafting string art yourself is relatively inexpensive and fun. The raw materials cost only a few dollars (see table above), so aside from the time investment, it’s a budget-friendly gift. You can fully customize the design, colors, and sizes. It’s also a great project to do with family or kids – Riveted Woodworking notes it’s a “perfect, repetitive activity” for teaching hammer skills. Plus, DIY allows you to tweak the piece until it’s exactly how you want.
Buying Custom: On the other hand, custom string art services save you time and can achieve very polished results. For example, websites like String Art Portrait let you upload a photo and, after previewing a design, send you either a kit or finished piece. DIY kits (pre-drilled with nails and instructions) are available from ~$20–$30, which is handy for beginners. Fully assembled custom portraits can be pricier: one 20″ round personalized thread portrait kit is listed at around $209. The premium goes to professional design work, pre-drilling, and high-quality materials.
In summary: if you enjoy crafting and have time, DIY is rewarding and cost-effective. If you prefer convenience or want a large/complex piece, ordering custom ensures expert results. Either way, string art makes a memorable gift.
Caring for Your String Art (& Framing Tips)
String art is relatively low-maintenance. The thread used is usually tight enough that it won’t easily come loose. Over time, dust can settle on the threads or board. The simplest cleaning method is gentle vacuuming: use a brush-less upholstery nozzle and lightly run it over the string art. (The vacuum’s suction won’t pull the thread off, because the nails hold it firmly.) Compressed air (from a can or air compressor) is another quick way to blow away dust. Avoid water or liquid cleaners on wood or thread.
For display, framing is optional but can add a finished look. Options include:
- Floater Frames: These frames surround the art without touching it, giving a “floating” effect. They look very professional and protect the edges/nails. Round string art pieces especially pair nicely with a round floater frame.
- Standard Frames: If your board is a common size (e.g. 8×10″, 11×14″), a regular picture frame can work. Just check the thickness so it fits.
- Embroidery Hoops: For circular designs, you can clamp the wood in an inner hoop ring – a budget-friendly “frame.”
- No Frame (Raw): Some designs look lovely on bare wood, especially if the wood has a natural grain or stain. LRCrafts suggests that “a raw board or canvas is exactly what your design needs… leaving it ‘natural’ can highlight your work beautifully.”.
Whether framed or not, keep the art out of direct sunlight (to prevent thread colors from fading) and away from moisture. A subtle gloss or varnish spray can be applied to seal and protect the piece if desired (test a small spot first to ensure it doesn’t alter the look).
Where to Buy or Commission String Art
If you prefer not to DIY, many artisans and kits are available:
- Etsy & Online Shops: Search for “custom string art portrait” or “personalized name string art.” Some creators will take your photo or idea and ship you the final product or a kit. For example, String Art Portrait offers personalized thread portrait kits (60cm round) and provides free design proofs before making the kit. String Art Portrait sells custom string art in black or color, starting around $30 (DIY kits) or higher for framed pieces.
- Local Craft Shops: Some craft or gift stores stock string art frames or customizable pieces for holidays (e.g. heart shapes for Valentine’s Day).
When commissioning a custom piece, read reviews and look at portfolio images to be sure of quality. Expect turnaround times from a few days (for pre-made kits) up to weeks (for fully custom portraits).
Conclusion
String art is a delightful blend of craft and personalization. From its 19th-century mathematical origins to today’s trendy rustic designs, this art form offers endless creativity. Making string art is simple enough for beginners, yet sophisticated enough to produce elegant wall décor. Whether you DIY a heartfelt string art piece or order a custom portrait, the result is a one-of-a-kind gift that carries a personal touch. It’s perfect for commemorating weddings, birthdays, anniversaries, new homes, or simply celebrating someone special. With a little care (and occasional dusting) your string art will last for years as a cherished keepsake. Embrace this timeless craft, and you’ll find that a few nails and threads can create memories as strong as the string itself.


Share: